If you want to learn the Linux command line by example, this is the place (we also have an intro here).
Linux is a big deal. Engineers seem to love it. Fortune 500 businesses definitely use it. Some argue most connected devices on the internet use some form of Linux.
And Linux is cool partly because you can issue text commands and have the computer do stuff. Even write those commands into a file, chain them together, and later run them all to automate stuff. Pretty cool indeed.
But I honestly was frustrated with what I found on Google. Lots of sites like to list popular Linux commands. However I couldn’t find a site which categorized and prioritized them in order to a point where even a beginner could easily understand and begin learning them.
So I did it.
Below are the among the most useful and popular linux console commands and have helped me for over 20 years. There certainly are more commands to know (and I don’t cover all possible options or ways of using each command) but these are the top, most fundamental ones to master and how to use them. Especially for beginners.
We’ll start with how to get started (makes sense?), navigating the file system, finding, viewing and manipulating files, networking, ownership, storage maintenance, working with and switching between programs (processes) and how to end your terminal sessions.
And you need to know these commands. Seriously. If you don’t and you are in the market to get a developer job that works with Linux (and many do! – especially in web development) you are in trouble.
Here we go!
A quick summary of what we’ll learn
- Getting Started with the terminal (a.ka. console or command prompt)
- Getting help with Linux commands
- Navigating the file system
- Viewing file details
- Piping
- Manipulating Files and Folders
- Find files
- Input and Output Redirection
- Networking
- Ownership and Permissions
- Storage / File System Status
- Controlling programs (processes) running on the system
- Switching between programs
- Working with Databases
- Ending your session
Getting Started with the terminal (a.ka. console or command prompt)
For beginners, try the Linux console right now and as you read this tutorial at the JSLinux Console app (runs right in your web browser). Or there are others too.
When you are ready you can also install Linux onto your OS (if you don’t already have it):
- If on Windows 10 – enable WSL (or WSL2) which comes with Windows 10
- If on Mac OS X – search and open up Terminal (it comes with your Mac)
- If you have Linux already installed, great!
1. Getting help with Linux commands
man
The man command (short for manual, like a book) is super helpful to understand what other Linux Console commands do.
For example, the below command will return to the screen a “manual” of the ls command (we’ll cover the ls command next). What the ls command does. What options it provides. And how to operate it.
man lsTry the man command on any of the commands in this tutorial! 🙂
2. Navigating the file system
ls
To see contents of the current directory you are in do an ls command
lsAlso very useful see contents in a list order including which user owns what, permissions details and file sizes
ls -lahcd
The cd command changes your current directory. Sort of like double clicking on a folder in Windows. Except you can just provide the name (the “path”) of where you want to go after “cd”.
This example takes you to the root “/” of the file system.
cd filesThe .. takes you back down a level
cd ..Or like this which takes you to a specific location in the file system relative to the root or top level folder (the “/” at the start of the path)
cd /user/local/binOr just cd which takes you to your home directory (on some systems it’s cd ~)
cdpwd
The pwd command is really handy for when you want to know where on the file system you are currently located. Just enter it like this example and it should return the current location (the path).
pwdclear
The clear command is nice to remove clutter (previous commands and output) from the console. Sometimes you just need this 🙂
clear3. Viewing file details
cat
To output the contents of a file called “filename.txt” to the console do a
cat somefile.txthead
If you want to see just the beginning part of a file
head somefile.txttail
If you want to see just the ending part of a file
tail somefile.txtAlso you can view lines as they are written to the end of a file using the -f flag. I’ve found it really helpful to monitor log files this way as activity is being recorded to them:
tail -f somefile.txtless
The less command let’s you view and scroll through a file without risk of changing its contents
less filename.txtScroll up and down using your keyboard. Then type q to quit and get back to the console.
wc
Count the number of lines, words and even bytes in a file. This is handy when you need to count for example the number of files in a directory.
For example, this command gives you the lines, words and bytes in file.txt
wc file.txtOr just get the number of lines
wc -l file.txtOr get the number of files in a directory (more on that pipe “|” thing later)
ls -l | wc -lstat
The stat command lets you view detailed file information, including when the file was created and even last modified. This can be useful to know in case you need to see when another person or program created or changed something.
For example if myfile is an existing file, this example gives you the last access (last time the file was read), modify (last time the content of the file was changed) and change times (last time the meta info of the file was changed) of the file. Including who owns the file and its permissions (more on that later).
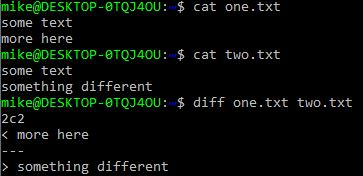
stat myfilediff
The diff command lets you compare differences between two files. This is really handy when you quickly need to see changes
diff fileone.txt filetwo.txtBelow screenshot is the same example with with two files I created and ran a diff against. You can see the first line in each file is the same. But the second lines are different. And our diff command is tells us that. The “more here” has a < arrow indicating it’s for the left file (one.txt). And the “something different” has a > arrow indicating it’s for the right file (two.txt).
Piping
Yep there is something called “piping” and it’s a thing in Linux. It’s actually considered an “operator” and not a command.
Using the Linux Pipe operator means directing output from one command as input to another. We actually did this already a few examples back with the wc command and here is another.
cat longfile.txt | lessThat is, if the contents of longfile.txt were a very long we could cat the file and instead of receiving output to the console the output of the command would be “piped” into the input of the less command. All in one line. And then you can scroll up and down within less to view the entire file (press q to quit). Pretty cool!
Manipulating files and folders
touch
The touch command lets you create an empty file or even change the timestamp information for a file. This is useful when you have some other program that requires a particular file to exist in order to run. Or if you need to adjust the
Here we create an empty file myfile.txt
touch myfile.txtOr create multiple files at once (where one, two and three are all filenames to be created)
touch one two threeAdjust the access time of a file
Adjust the modification time of a file
mkdir
The mkdir (make directory) command allows you to create a directory, like this
mkdir newfolderYou can even create a directory many levels down like this with the -p flag, where /some/path/to/ is the directory to place your newfolder within, except that if the path leading up to newfolder doesn’t already exist it will be created.
mkdir -p /some/path/to/newfoldercp
The cp command copies one file to another and can also be used on folders as well.
For example if file1.txt already exists then we can copy it to newfile.txt like this
cp file1.txt newfile.txtWe can also copy an existing folder (folder1) to a new one (newfolder) like this with the -R flag. The R is required to copy a folder and means copy the folder and all its contents recursively.
cp -R folder1 newfoldermv
The mv command moves a file or folder from one name or location to another.
For example, we can change the name of an existing file from one.txt to two.txt. But be careful, if two.txt already exists the default behavior is to overwrite two.txt with one.txt!
mv one.txt two.txtWe can also move the file to another location on the file system by specifying a path
mv one.txt /some/path/hereOr move a file at a particular location to another by specifying a target and destination path
mv /my/file/here.txt /some/new/path/here.txtWe can also move directories like this. But notice the destination path ends in a forward slash (that’s on purpose) and it tells the mv command to move “folder1” so it ends up at /some/path/folder1
mv folder1 /some/path/rm
The rm command removes files or folders (or both at the same time if you want!). You do need to be careful as there is NO undo command when you successfully remove a file/folder.
Here we are removing an existing file (file.txt)
rm file.txtNow we remove an existing directory (again be careful you aren’t deleting your important work)
rm -r directory1Also, if for whatever reason the above recursive command does do the job you can force the rm command to recursively remove a directory like this
rm -rf directory1echo
The echo command will print output to the screen. In this example we print “some text” to the console.
echo "some text"Or maybe a more useful method is where output can be redirected to a file like the below example. The >> operator appends text to the end of the file and doesn’t overwrite anything.
echo "add some text to end of the file" >> file.txtOr use the > operator to overwrite (replace) what was already there.
echo "this text will replace what was in the file" > file.txtvi
The vi command is actually a text editor program and is included with many distributions of Linux. It is useful for making changes to files and does not have a GUI. It’s light weight and once you get the hang of it is very easy and efficient to use.
For example if we want to open a new file (newfile.text), do this
vi newfile.txtThen press “i” to go into insert mode in order to start typing text (go ahead and type a little text).
Then to save changes press esc to get out of insert mode, followed by colon “:” followed by w and hit enter. This will write changes to the file.
To exit the file, make you you press esc (if still in insert mode), followed by colon “:” followed by q and hit enter.
You can also save and exit in one command by doing esc and then : and x
And you can open an existing file by specifying the name or path, like this
vi existingfile.txttar
The tar command is great for group files into an archive (and even compressing that archive). In other words taking multiple files and balling them up into one file. That’s really useful when you want to send a bunch of files over the network to another computer (maybe as a downloadable file). And that way the transfer happens much faster than having to transfer each file individually.
In this example we are create an archive “myarchive” from file1.txt and file2.txt. We supplied the c flag to tell tar to create the archive, the v flag so we get some output to the console about what tar actually does and the f flag to tell it we want “myarchive.tar” as the archive filename.
tar cvf myarchive.tar file1.txt file2.txtView what’s in the tar archive using
tar tvf myarchive.tarWe can then add files to an existing archive (here we add file3.txt to the existing archive file)
tar rvf myarchive.tar file3.txtWe can also extract files from an exisiting archive like this
tar xvf myarchive.tarAnd it’s also possible and very useful to add the z flag to any/all the above tar commands to enable gzip compressions of the archive file (makes the file smaller).
zip
The zip command is similar to the above tar command. Except that zip includes compression while you have to specify the “z” flag to tar to get it to compress. I prefer to use zip just because it’s less work to do 😉
Here we create an archive (“archive.zip”) and put the fileone.txt and filetwo.txt files into the archive:
zip archive.zip fileone.txt filetwo.txtThen we’ll add to the existing archive:
zup -u archive.zip three.txtNow we create a new archive from a directory and also throw in a file along with it (both can be added at once)
zip -r new_archive.zip directory_name fileone.txtThen unzip an existing archive
unzip archive.zipZip also might be a little less efficient than tar and the “z” flag as discussed here but honestly most of the time it doesn’t matter and zip is just better in my opinion because it’s easier to remember and use.
Finding files
locate
The locate command is probably the easiest way to search for files and directories by their name. It uses a pre-built database of files and their locations to give you search results.
Here we tell locate to find “filename.txt”
locate filename.txtWe can also use the -i flag to make sure to ignore case, meaning we’ll get back file names that have both capital and non-capital in their spelling regardless if you searched for it or not:
locate -i Filename.txtAnd to make sure locate finds what we need, you may want to run the updatedb command (I am using sudo before updatedb and more on that later):
sudo updatedbfind
The find command is great
- when you need to search for a file in a place you think it might exist. Maybe somewhere in a directory or way far down in a sub directory. Just give it a starting point and let it search!
- If you are not sure what the exact file name is but you have an idea. Like you know the file name contains or starts with something.
- When you don’t want to wait for the updatedb command to finish running, which may take some time, before the locate command can search for all files.
Here we tell find to go and find files with the name “filename”. It will search in the current directory (that’s the “.”) and it will also search any and all sub directories within the current directory:
find . -name filename.txtNote that you need to specify the full file name file like filename.txt and not just “filename” otherwise find will not return what you’re looking for.
If you want to do a wild card search, that’s where you find files matching a pattern, you can use the * operator. Here we are telling find to search for files starting with the name “filename” but could also end in .txt or any other set of characters. This is really useful if you don’t know the filename exactly but you have an idea.
find . -name filename*grep
The grep command let’s us search the contents of files. This is really nice to have when you are searching for something but you don’t know the file name at all and you think it’s located in some random place.
Here we tell grep to search for “some text” starting within the current directory “.”. The -r flag tell grep to also search all sub directories within the current directory.
grep -r 'some text' .Thing is, you will get back lots of info and sometimes that’s great or sometimes it can be too much and you just want to know which file name matches your search.
In that case use the -l option like this
grep -rl 'some text' .Input and Output Redirection
>>
The >> operator is used to append text or output to the end of a file. For example we can append the output of the ps command to the end of the file “file.txt”. And every time we run that command the file will grow.
ps >> file.txt>
The > operator is used to overwrite the contents of a file. Here we overwrite file.txt with the output of the ps command. Each time we run the command the file will not grow and will just have the latest output from ps.
ps > file.txt2>
the 2> operator will redirect what is called “standard error” to the file “errorfile.txt”. This means if I have a program called “myprogram” and when I run that if it produces errors, those errors will then be redirect to errorfile.txt. Here is an example:
myprogram 2> errorfile.txtOr you could start to get fancy like this next example:
- List whatever is in the “somedirectory” directory (or if its a file)
- And then redirect the output into the “directorylist” file
- But don’t stop there – also redirect the standard error to &1 which is going to be the target of the output which means to the directorylist file.
ls somedirectory > directorylist 2>&1So the output and errors will both end up in that file. That’s useful if you have some automation running and you want to record not just the output but also if something went wrong.
Networking
ping
The ping command lets you send a ICMP (Internet Control Message Protocol) echo request packages to a destination and find out if that destination is online and responding. Think of ping as a way to check that a website or IP address is reachable.
This is helpful when figuring out if your local host for example is connected to the internet. Where you could ping google.com like this:
ping google.comAnd then you’d get back a series of replies. Hit ctrl+c to quit and stop sending pings.
What’s also nice is you’ll receive a time in ms (milliseconds) that each ping took to get back to you (the round trip speed from you to the remote host and back). If the time in ms is long (say a second or longer) you may have some issue happening with your network. For example, typically I’ll get 14 ms or so when pinging Google.com. So that would be a “fast” remote host.
wget
The wget command is really good at downloading files 🙂
I use it often to grab something, either a web page or a file from the web. Like this zip file which will download to whatever directory I ran wget from:
wget https://gowithcode.com/somefile.zipOr save the downloaded file as a different name (saving “somefile.zip” as “different_name.zip”):
wget -O different_name.zip https://gowithcode.com/somefile.zipcurl
The curl command can also be used to download files but it’s really good at sending data to and from a remote server using protocols like HTTP, FTP, IMAP, POP3, SCP, SFTP, SMTP, TFTP, TELNET, LDAP or FILE.
Basically if you want to query or post data to a remote web service, curl let’s you do that.
Here we do a POST request to send some info (a username and password specified by the -d flag) to a remote service. The -X flag lets us tell curl to use POST, otherwise GET is used by default:
curl -d "user=mike&pass=123" -X POST https://gowithcode.comOr grab a web page and bring it into your terminal (doesn’t download, just gets the web page and you can see the source code in your terminal):
curl https://gowithcode.comOr download a file to your current directory
curl -o somefile.zip https://gowithcode.com/somefile.zipssh
The ssh command is great at logging into a remote server (host) from your current terminal.
ssh user@remotehostAnd then it’ll usually ask for a password.
Sometimes I’m also specifying an SSH key like this and that way if there is a corresponding key setup on the remote server (host) I won’t need to enter a password. Great for when you need to log into a server often and don’t want to remember the password.
ssh user@remotehost -i <key_file>Ownership and permissions
w
The w command lets you quickly see who is logged into the linux system. Just run it like this:
wsudo
The sudo command is something you will use when you need to run a program with security privileges of another user, typically the superuser (root).
In this example “someprogram” is a program that won’t run as a non-root (lower privileged user), so we then run it using sudo.
sudo someprogramAfter running sudo the system should ask for your password and record the activity.
chmod
The chmod command is used for setting the permissions of a file or folder. Who can read, write and execute the file.
For example we can make the permissions of somefile.txt readable, writable and executable by the file owner, the group and everyone else.
chmod 754 somefile.txtThat is
- The first digit 7 means the owner can read (4), write (2) and execute (1) the file. In other words, 4+2+1 = 7
- The second digit 5 means the group can read (4) and execute (1) the file. The group can’t write (2) to the file. In other words, 4+0+1 = 5.
- The third digit 4 means all other users in the system can only read (4) the file. They can’t write (2) or execute (1) the file. In other words, 4+0+0 = 4.
chown
The chown command is great for adjusting which user owns a file and even which group the file should belong to. In this example we make the “somefile.txt” file owed by the mike user and also have it belong to the developer group.
chown mike:developer somefile.txtStorage / File system status
du
The du command tells us information about how large a file is or how much disk space a file or directory is using.
For example, using the -h flag we can see the file size in human readable format for a file named “largefile”:
du -h largefileIt is also useful to have a summary when you want to know the file size of a directory vs all it’s sub files and folders. For example this command uses the -sh flags to return a summary of the file size of the current directory “.” in human readable format. Without the -s flag you end up getting all the sub files and folders (but maybe this is what you wanted).
du -sh .mount
The mount command is good for seeing what file systems or devices (like USB drives) are attached to your system.
Do that by running it like this:
mountIt’s also possible to attached and detach file systems to and from your system. Here we are simply create an alias from /some/device to /your/custom/path so we can reference the device with something we are more familiar with:
mount /some/device /your/custom/pathumount
And then we can un-mount what we did above like this
umount /your/custom/pathControlling programs (processes) running on the system
ps
The ps command let’s you know what’s going on with your system, meaning which processes/programs are running.
Here we check for things running in the current shell or terminal
psOr get a tree of processes and their parents/children which gets you a little more detail
ps afThe ps command also gives you the “PID” or process ID and this is important as we will later see…
top
The top command can be run like the below example which gives a list of processes and shows them changing over time. The top half of the top output shows system statistics and the bottom half shows the actual processes, including their PIDs (process IDs), %CPU and %MEM (RAM used):
Run it like this:
topSo if a process is having a high %CPU or %MEM top can let you know and then you can take some action against it.
kill
The kill command is great for ending a process that maybe is doing something you don’t want it to do. Like use too much CPU or RAM as you would find out from the ps or top commands.
Here we use the kill command with the -9 parameter (this tells the command to actually kill a process), with the process ID (PID) of 1234:
kill -9 1234Switching between programs
ctrl+z
The ctrl+z is literally where you are already inside another program, then hold down the ctrl button and also press z on your keyboard. It will pause the current task or program you are running in your terminal and bring you back to the terminal command prompt. So you can run another program.
This is sort of like minimizing a window and allows you to work on something else in the meantime.
ctrl+zjobs
The jobs command will list all paused (or “active”) jobs in your current terminal shell along with an ID like 1, 2, 3, etc. This is great for figuring out how many and which jobs you may have paused.
%
Then after you run the jobs command, to get back to your paused application use the % operator like this, which would bring you back to the first paused job.
%1And you could do ctrl+z to get back out, run jobs and go into another job at your convenience.
So using the ctrl+z, jobs and % commands/operators is super helpful to switch between applications in the terminal shell and I am using this often.
Working with Databases
mysql
The mysql command (if that’s installed on your systems) is great for interacting with a mysql database, probably one of the most popular relational database programs in the world.
Running the mysql command like this specifies the username, the hostname and a database name. As soon as you run it, mysql will ask for your password. I’ve used this many times when logging into a mysql database to view information. And is super hand when you want to make quick edits to a WordPress or even a Drupal site which runs on mysql (if that’s what you’re into)
mysql -u <username> -p -h <hostname> <database_name>You could also import a database file like this, where the databasefilename.sql is an existing database file:
mysql -u <username> -p -h <hostname> <database_name> < databasefile.sqlmysqldump
The mysqldump command is great for exporting a database, meaning all its tables and data, into a single file.
That’s handy when you want to:
- Search and replace within the file and this saves you lots of time vs having to query within the database program and making edits that way
- Export the database so you can send it to a remote host or just transfer between computers
Here we run mysqldump and output a database to the output.sql file.
mysqldump -u <username> -p -h <hostname> <database_name> > output.sqlEnding your session
exit
The exit command is fitting in that we are at the end of our tutorial on linux terminal commands.
And so you would type the below command to end your terminal/shell session.
exitAnd there you have it, the most useful Linux Console commands you will need
By the way many (not all) of these commands are also useful in Microsoft’s Powershell (console program) which comes with Windows 10. Some examples include cd, ls, mkdir, rm, etc. – I think they just want to be like Linux 😉
And let me know in the comments which other Linux console commands you prefer to use and why 🙂
Mike is the creator of Go With Code and a coder at heart 🙂